This guide shows an example of how to control the BeoRemote Halo through simple macros. In this case, the Halo will be used to show a clock and the weather. In both cases we will use a BeoRemote Halo with the name “Halo” in an area called “My_Area” in a zone called “My_Zone”.
CLOCK
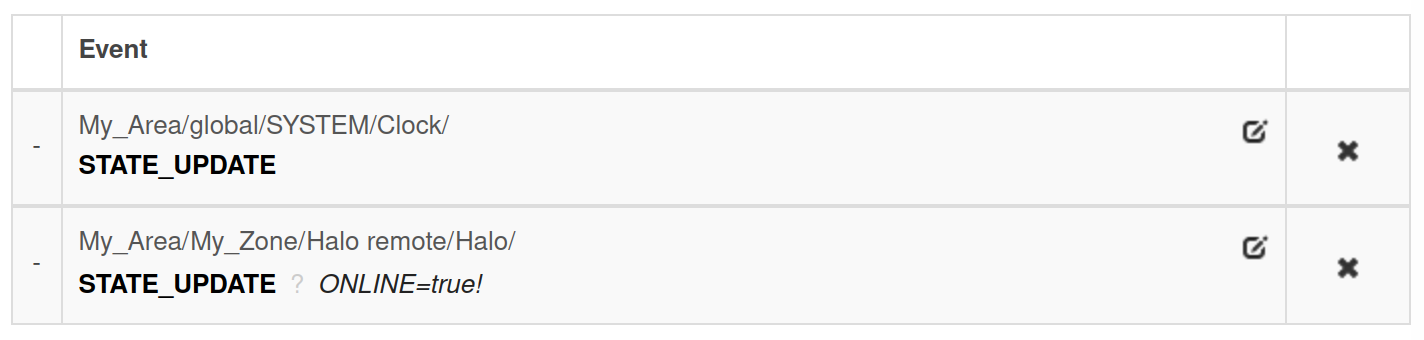
First we’ll start with the clock, we will show the time in the center of the button and the month and day in the subtitle, the macro should be fired when the halo becomes online and each time a minute passes. For this macro, we will use the system clock.
The events for this macro are:
The code is as follows:
function(event, engine)

  ------ FILL WITH YOUR INFORMATION -----
  local halo_resource = "My_Area/My_Zone/Halo remote/Halo"
  local halo_button_id = "497f6eca-6276-4993-bfeb-000000810206"
  ----------------------------------------

  local clock = engine.query("*/*/SYSTEM/Clock")[1]
  day = clock.get_number("day")
  month = clock.get_number("month")
  hour = clock.get_number("hour")
  minute = clock.get_number("minute")

  if tonumber(minute) < 10 then
    minute = "0"..minute
  end
  if tonumber(hour) < 10 then
    hour = "0"..hour
  end

  engine.fire(halo_resource.."/SET_TEXT?BUTTON="..halo_button_id.."&TEXT="..tostring(hour)..":"..minute)
  engine.fire(halo_resource.."/SET_SUBTITLE?BUTTON="..halo_button_id.."&SUBTITLE="..day.."/"..month)

  engine.fire(halo_resource.."/SET_WHEEL_VALUE?BUTTON="..halo_button_id.."&VALUE="..tostring((math.floor((hour%12)*100/12))))
end
The macro begins by checking the clock’s state and getting the day, month, hour and minute values. If the hour or minute is below 10 we add a 0 so that we always get 2 digits. Then the only thing missing is to set the button text with “hour:minute” and we add “day/month” to the subtitles. Just to give it a “clock” feel we can add the last command which will set the state of the wheel to the current hour, as the wheel accepts values from 0 to 100 we convert the numbers so that it goes from 0 to 12.
WEATHER
This macro will read the current weather and write it in the subtitle as well as showing a related icon every time the button is pressed. For this one we will use the Open Weather system included in the BLI. As resources we will add a CURRENT_WEATHER resource (although you can choose 3 or 24 Hrs forecast if you prefer), as address set the latitude and longitude of the place you would like to know the weather of. In this example we will use “-34.0634:-55.7284” and name the variable Uruguay.
The events for this macro are as follows:

The code:
function(event, engine)

  ------ FILL WITH YOUR INFORMATION -----
  local open_weather_resource = "My_Weather_Area/My_Weather_Zone/_CURRENT_WEATHER/Uruguay"
  local halo_resource = "My_Area/My_Zone/Halo remote/Halo"
  local halo_button_id = "497f6eca-6276-4993-bfeb-000000810205"
  ----------------------------------------

  weather_query = engine.query(open_weather_resource)
  local rain = weather_query[1].get_boolean("_Rain")
  local snow = weather_query[1].get_boolean("_Snow")
  local temperature = weather_query[1].get_celsius("_Temperature")

  local icon = 0
  local subtitle = 0

  if rain then
    icon = "humidity"
    subtitle = "RAIN"
  elseif snow then
    icon = "cool"
    subtitle = "SNOW"
  elseif temperature > 20 then
    icon = "heat"
    subtitle = "HOT: "..tostring(temperature).."˚C"
  else
    icon = "cool"
    subtitle = "COLD: "..tostring(temperature).."˚C"
  end
  engine.fire(halo_resource.."/SET_ICON?BUTTON="..halo_button_id.."&ICON="..icon)
  engine.fire(halo_resource.."/SET_SUBTITLE?BUTTON="..halo_button_id.."&SUBTITLE="..subtitle)
end
We begin by asking the variable for the current weather, in this case we ask for the Rain, Snow and Temperature, but there are other things you can get (see which ones in Tools->Resource States in the current_weather variable) and then we initialize the variables for the icon and subtitle. We will have to go through these variables and decide which icon and subtitle to choose, if it rains we set the word “RAIN” and the icon for humidity (which is a water drop), if it snows we choose “SNOW” and the cool icon (which is a snow flake). If none of the above apply we decide with the temperature, in this example we chose degree Celsius but you can change the number 20 to 68 if you want Fahrenheit. We decide that a temperature above 20 is hot and below is cold and we add the number to the subtitle. Lastly we set the icon and subtitile of the halo with the values chosen before.