This is the user setup menu, their rights and interfaces are generated by BLI PRO.
It’s possible to configure the following features:
- Users that can access the system and access restrictions.
- Sources and features of A/V products.
- Access to IP cameras in the house.
- Resources and macros that appear in a zone.
- Virtual resources that provide a friendly way of interacting with some systems.
- Lists with favourite TV channels and radio stations.
The resources to be accessed via the user interfaces are configured in this page. The user interfaces are:
- BLApp: BLI specific user control application that could be installed on any iOS based device.
- Webpanel: User control interface accessible through BLI web interface.
- TV overlay: User control interface application accessible through any Bang & Olufsen NetworkLink TV as Home Control. Same layout as Webpanel.
Configurations are synchronized in real time towards the Webpanel and the TV overlay. Synchronization with the BLApp is done periodically and could be forced by activating Configuration > Quick save revision.
Users - admin
The user named admin is a user that exists per default and is meant for the technician/installer. It has access to set up the BLI PRO and is allowed to access all zones via browser or BLApp.
Change password for admin user
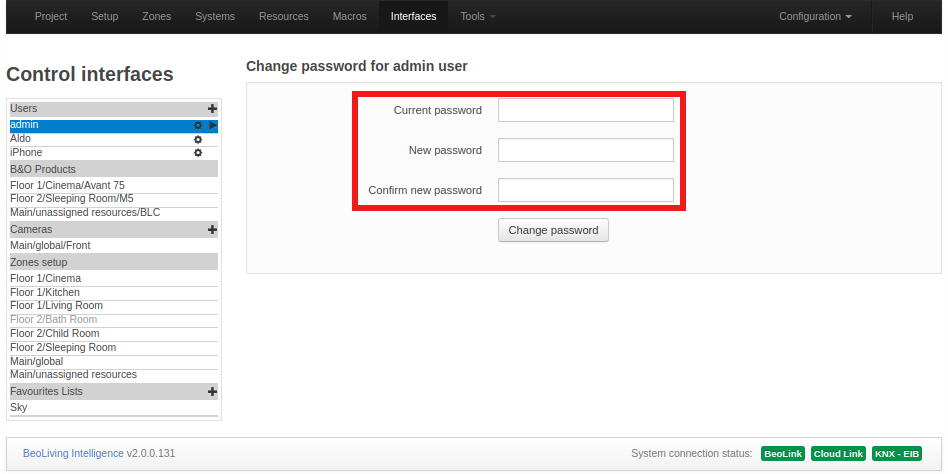
Per default, admin password is unknown but it can be set to “admin” by activating the Setup button function No.2 (See button functions). This password will last 5 minutes (for security purposes) during which a new one must be set. Press the admin entry in the left column to change password (see figure above).
Users - new user
To add a new user press “+” sign in the Users header (left column).
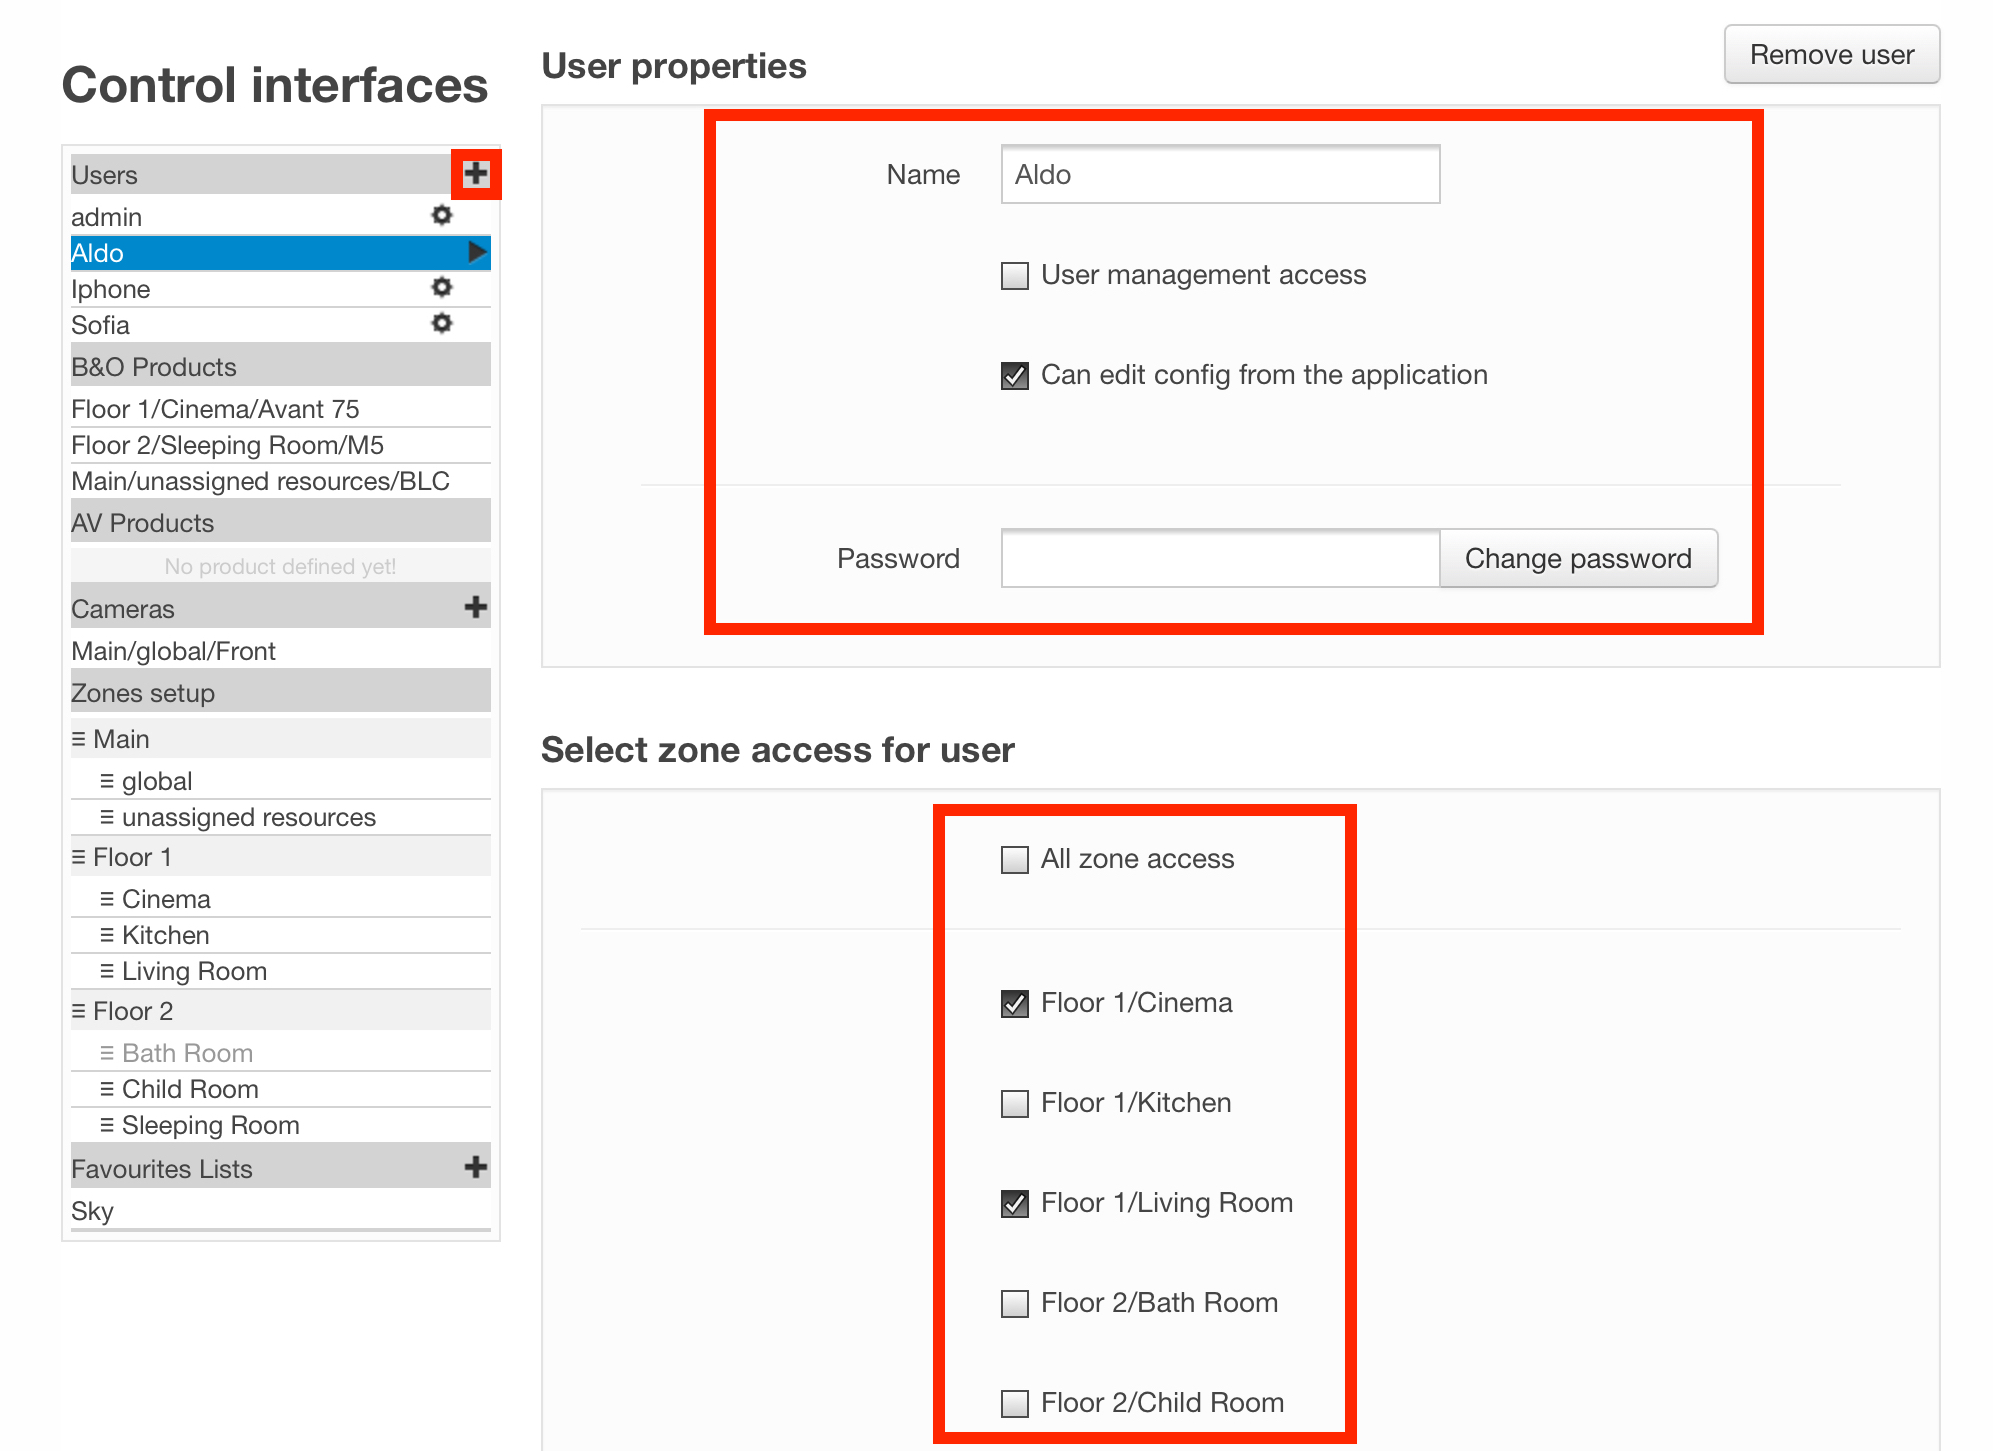
User properties
Configure User properties by entering a name under the Name field and password in the Password field. Then select options according to the following:
- User management access: when selected, the user is allowed to administer users and user-rights. This option should be set for the owner of the installation or a ‘superuser’ who is responsible for managing user access.
- Can edit config from the application: when selected, the user is allowed to create scenes and edit device settings or zones from the BLApp.
Select zone access for user
Finally, choices should be made in Select zone access for user. All zone access may be selected or a selection of individual zones from the list presented.
B&O products
For B&O products there are some basic options and a source list that can be presented to the user.
When selecting any product, the next sections are displayed.
NetworkLink product: area/zone/product

- Name: Possibilty to rename the product.
- Address: The product’s serial number.
- Force IP address: Define a fixed IP address to connect to the product. This is not recommended and should only be used as a workaround in
situations where product discovery has shown not to be reliable.
It may also be used to access equipment installed on another (reachable) network.
- Beo4 navigation: Whether the product is set up for the old Beo4 navigation or the new navigation with cursor keys and SELECT.
- Show product sources on their zone: Hides product sources in its zone if not selected.
- Set new automatically synchronized sources as visible: New synchronized sources are not set as hidden.
Product sources
For each product all local and distributed sources are shown in the Sources in product table.
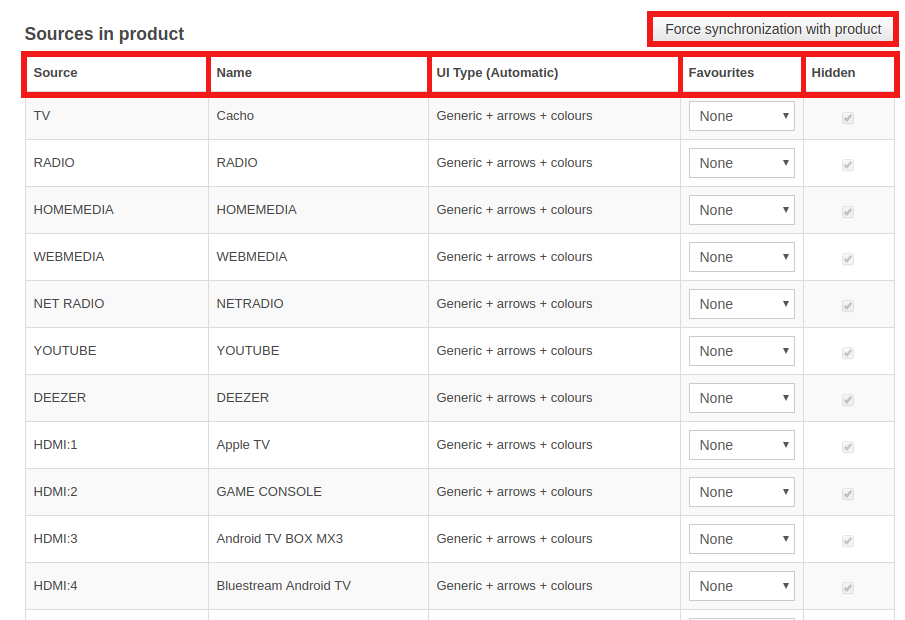
This is synchronized automatically from the product configuration (if the product is online). In case of any problem with automatic source synchronization, Force synchronization with product button will get the current sources of the product.
The information provided in the Sources in product section for each source is the following:
- Source: Type of source.
- Name: Source label in all user interfaces.
- UI Type: Reference for the mobile application about what type of user interface is needed for operating the product.
- Favourites list: This makes it possible to select a favourite list defined in the Favourites section.
- Hidden: Selects if source must be hidden in all user interfaces or not.
AV products
For other AV products there are some minimal options you can change, regarding the icon that the product has, or the sources that will appear, on the app.
When selecting any product, the next sections are displayed.
Product options
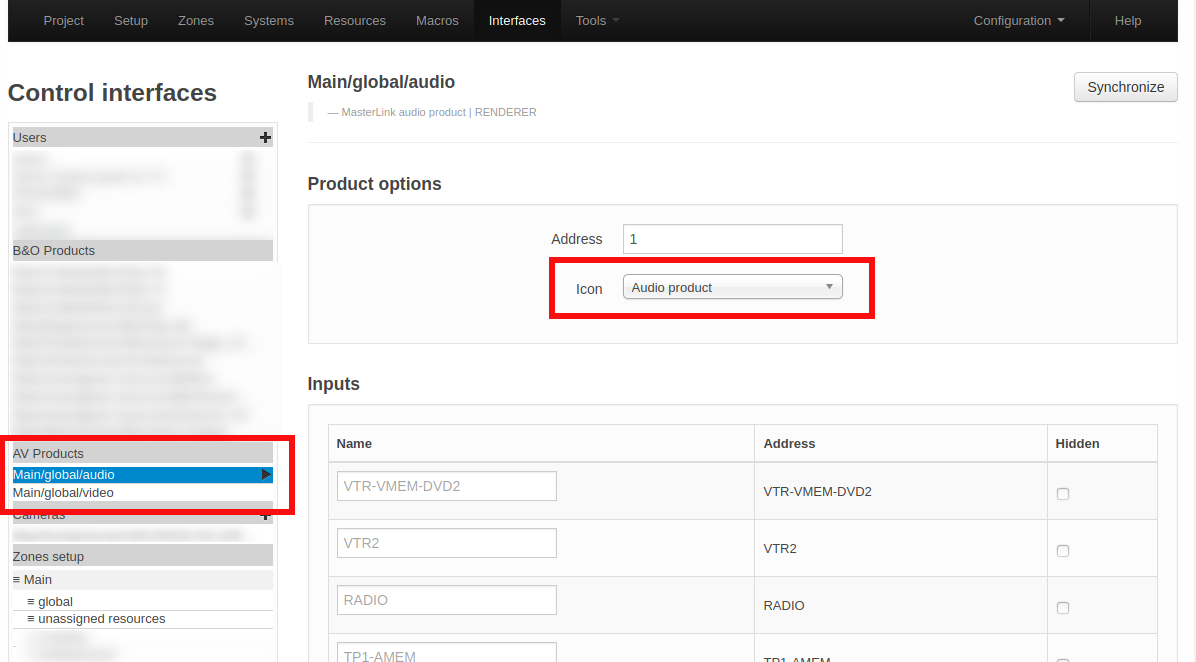
- Address: Whatever was configured for the resource.
- Icon: Select the icon you want to appear for the product in the app
Inputs
Here you can rename or hide the Source commands that will appear for the product in the app. The defaults are not necesarilly available in the product.
Cameras
The configuration of several network cameras is permitted. To add a camera, press the “+” sign in the Cameras header (found in the left column).
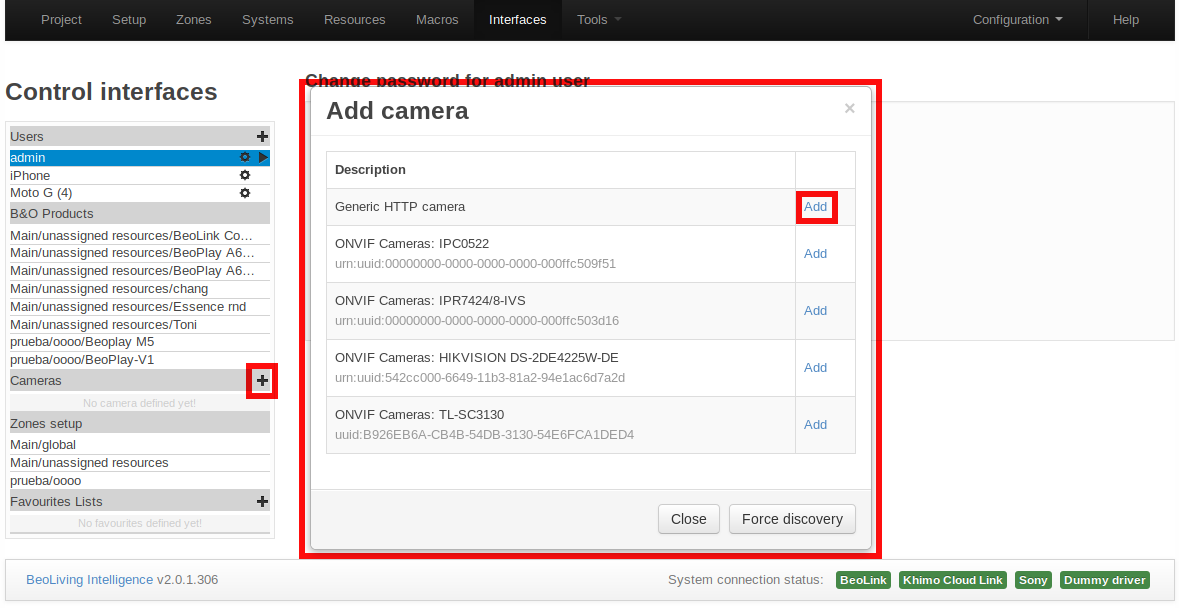
For more information on how to set up a camera, and to find out which cameras are compatible, please refer to the Camera integration guide.
Zone setup
In this section of the Interfaces page, for each zone it is possible to reorder, hide/show and rename the resources to be seen in the user interfaces.
Resources for area/zone
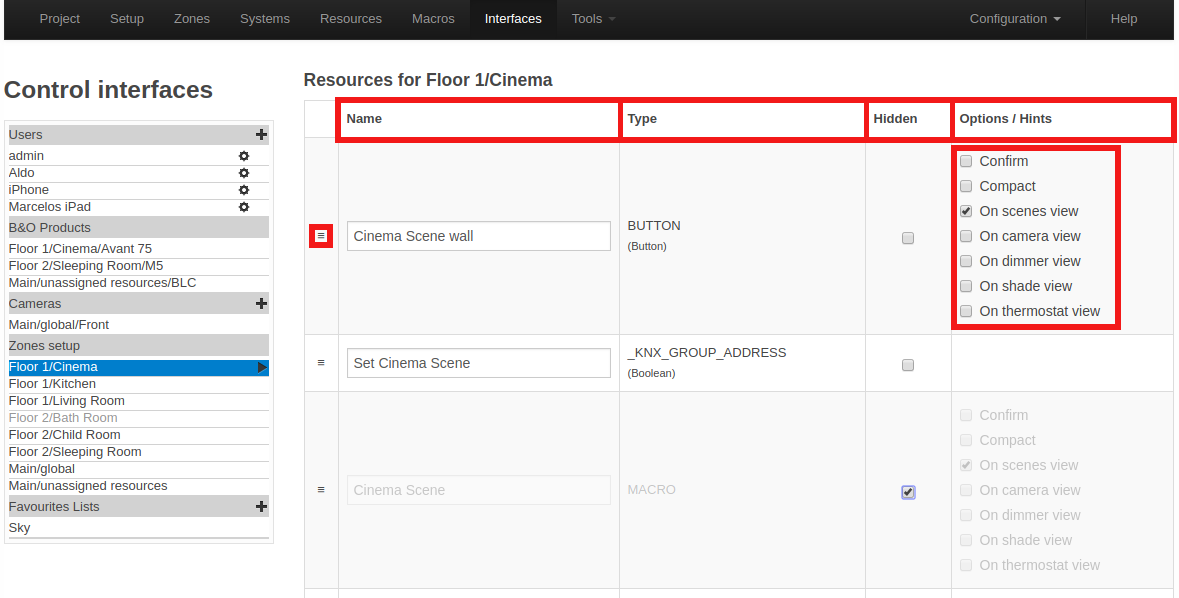
For the resource to be moved in the list, place the cursor over the left button (three horizontal lines), then click and drag the resource until the line-marking is where the resource should be placed and release the mouse button.
- Name: Possibility to rename the resource.
- Type: The type of the resource is stated.
- Hidden: Set if the resource must be hidden in the user interface.
- Options/Hints: For macros and buttons that are visible on the user interfaces the following options are available:
- Confirm: If this option is enabled, after a button press or after a macro is triggered the action will need confirmation on a hand held device.
E.g. pressing a Yes button to avoid unintended activation before the desired function is executed. This could be when an action should not take place unintended, e.g. activating ‘Vacation mode’.
- Compact: When enabled the button in the user interface will be shown in a half-width button.
E.g. there is room for two buttons per line.
- On camera view: With ‘On camera’ enabled, when using WebPanel the half-width button will be shown next to the IP camera images in that zone. When BLApp is used, the button will be shown in the Cameras section of BLApp.
- On scenes view: When enabled, the button will be shown in the Scenes section of BLApp
- On dimmer view: When enabled, the button will be shown in the Lights section of BLApp.
- On shade view: When enabled, the button will be shown in the Shade section of BLApp.
- On thermostat view: When enabled, the button will be shown in the Thermostat section of BLApp.
- Confirm: If this option is enabled, after a button press or after a macro is triggered the action will need confirmation on a hand held device.
Favourites Lists
In this section of the Interfaces page, favourites lists for TV channels as well as radio stations can be added. In the hand held devices the favourite channels/stations are listed by name and logo if such is selected.

To add a new favourites list, press the “+” sign in the Favourites Lists column entry. In the top left field of the display, enter the source provider’s name. The Clone button (top right) is used to clone an existing source provider of favourites. The new one will show in the left column list, adding ‘Clone of’ to the name. The Remove button is used to remove a source provider of favourites chosen in the left column.
Commands global options
For each favourite list a global End command, a global Delay and a global Delay on source selection that will affect each favourite command can be set.
- End command: The end command is added at the end of each favourite command sequence and can be either NONE, PLAY or SELECT.
- Delay: The global delay is a delay value added between all digits and between digits and the end command for each favourite command.
- Delay on source selection: Delay that will be added previous to the first digit for each favourite command sequence, if source was effectively selected (i.e.: if the source was already selected, this delay will not be set).
List of favourites
For each listed TV channel/radio station the following information should be provided:
- Caption: A short description for the favourite. The caption will be filled in automatically when the logo picker is used. If edited it will remain unmodified. The caption will appear in the user interface.
- Command: The command that is executed when a logo is selected in the BLApp. See in Help for full explanation of combining elements in the command string. The command must be filled in manually.
- Logo: A logo can be fetched using the logopicker, see below, or by entering sufficient information in the URL field for the favourite. The logo will be shown in the user interfaces.
- URL: The full URL of the logo image to show. The URL must point out the valid image as it will be used periodically by BLApp to retrieve the logo. The URL will be filled in automatically when the logo picker is used. The URL can be entered manually.
Logo picker
The logo picker shows a pop-up window for selecting logos from the B&O repository and shows up by clicking the logo. Available logos are shown in groups of 50. It is possible to search for a channel using the filter. A search string will immediately restrict the channels displayed to only the matching entries. When a logo has been chosen the picker window will close and complete the URL path and command fields, and show the selected logo. The caption will also be updated, but not if it has been edited explicitly.
Note: The logo picker only works when an Internet connection is available.