Introduction
This guide provides:
- A description of all the elements you will find inside a BeoLiving Intelligence box.
- How to find and access BeoLiving Intelligence within the network.
- An overview of different sections of its web interface in ESSENTIAL mode.
- How to upgrade your BeoLiving Intelligence to PRO mode.
Most of the BeoLiving Intelligence configuration and usage in ESSENTIAL mode is done through the BeoLiving App. This Smart Device application lets you customize your installation and control all devices on it. BeoLiving Intelligence also provides a web interface, which out of the box provides Network settings and User access control management. After upgrading your controller to BeoLiving Intelligence PRO, the web interface becomes the most important tool for installation, configuration and programming.
Admin Sign-in: An installer can access the BLI setup interface with the admin user, which has an unknown password by default. The Setup button function 2 (check Button Functions) can be used for setting the admin password to “admin” for 5 minutes, and the BLI will request a password update as soon as the web interface is accessed.
Terminology
- BeoLiving Intelligence ESSENTIAL: BeoLiving Intelligence in ESSENTIAL mode.
- BeoLiving Intelligence PRO: BeoLiving Intelligence in PRO mode.
- BLI: Alias for BeoLiving Intelligence.
- BLI ESSENTIAL: Alias for BeoLiving Intelligence ESSENTIAL.
- BLI PRO: Alias for BeoLiving Intelligence PRO.
- BLApp: BeoLiving App.
- LAN: Local Area Network.
- DHCP: Dynamic Host Configuration Protocol.
- PoE: Power over Ethernet.
What's inside the box
After opening BLI’s box you will find:
- BLI hardware.
- Wall bracket for BLI.
- AC power supply.
- Quick setup guide.
BeoLiving Intelligence hardware description
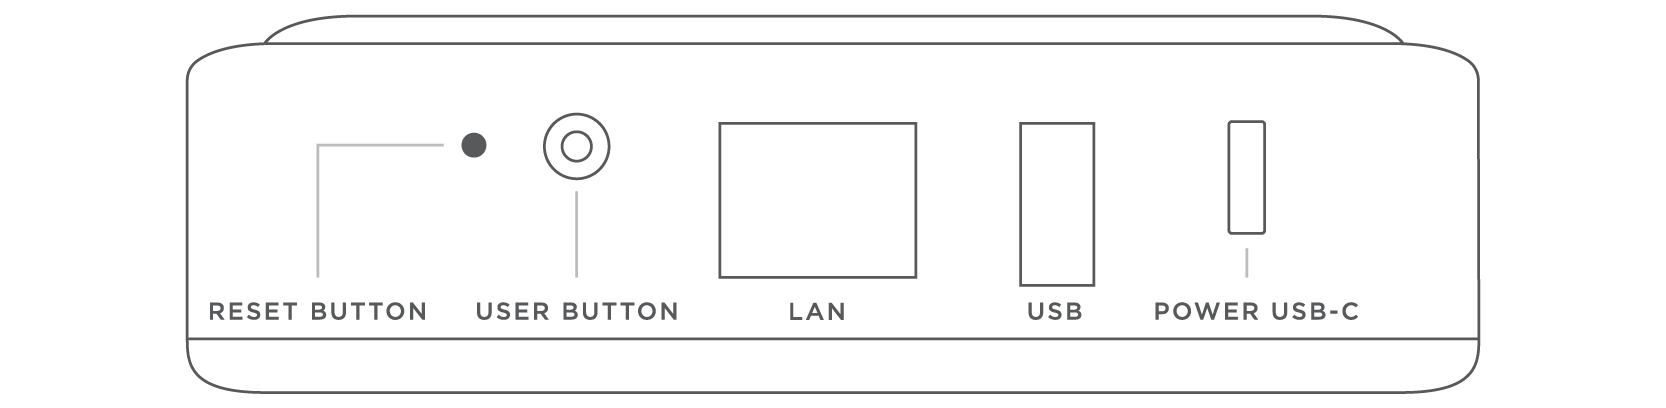
Connection Panel
Located on the back of the BLI:
- System Reset Button: Press & hold for 8 seconds to reboot the system.
- User Button: This button is intended for user confirmation and button function input. For more information refer to Button Functions section.
- LAN Connector: For connecting the BeoLiving Intelligence to a local network.
- USB Port: The USB port can be used for connections via RS232 or for service purposes.
- Power USB-C: Powers the BLI.
Please note that BeoLiving Intelligence generation 3 can be only powered by the *USB-C connector
User Led
- User LED: The circular LED located on top of the BLI is used to signalize the current state of the BLI, using different colours and ON-OFF pattern combinations. Colours could be Green, Red or Yellow and the patterns could be Solid, Flash and Quick Flash. For more information about different BLI LED states refer to Led States section.

Led States
All the possible user LED states with their respective meaning are shown in the following table.
| Activity | LED state |
|---|---|
| Normal operation | Solid Green |
| Critical error | Red / Yellow flash |
| Firmware update | Red quick flash |
| Loading configuration | Green quick flash |
| Waiting for User confirmation | Green / Yellow quick flash |
| User confirmation acknowledge | Solid Yellow |
| Boot | Solid Red |
Accessing the BeoLiving Intelligence
The BLI has a web interface that can be accessed from a network browser. By default, BLI is configured on DHCP mode, meaning that it gets the IP address from the router it’s connected to.
IP address discovery suggestions
- Look up “_hipservices._tcp” using an application that supports Zero-configuration, such as the Safari browser or the avahi-browse command.
- Use a network scanner/IP-scanner (e.g. Fing) on the same network as the BLI.
- Access your LAN router and search for the IP assigned to BLI.
Set static IP address mode
A static IP-address can be set to the BLI by accessing through the web interface, as described in the Network section.
Direct access
The BLI can be set to the factory default IP-address 192.168.1.10 by activating the Setup button function (3); see Button Functions. Once this address is set, you can access it directly using a network browser and an Ethernet crossover cable. Note that the computer must have an IP address in the same range, e.g. 192.168.1.11 with subnet mask 255.255.255.0.
User button
BLI has a button on the connection panel, next to the reset button, which provides several functions during normal operation.
To execute a function, press and hold the setup button. This will cycle through all available functions as indicated by the LED blinking (it will blink once for function 1, after a while it will blink twice for function 2 and so on).
Release the button when you get to the desired function number, where the LED will start to blink waiting for a confirmation. Press the button again in order to confirm the function execution.
- Function 1: Reserved.
- Function 2: Set admin username’s password to “admin” (valid for the following) 5 minutes. Check the Setup interface section for further information.
- Function 3: Set network settings to fixed IP (192.168.1.10).
- Function 4: Set network settings to use DHCP.
- Function 5: Erase all configuration and settings.
In addition to being used to confirm the input function, a single press during normal operation is used to fire System events (refer to BeoLiving Intelligence PRO User Guide).
Step by step example
- With the BLI in normal operation (green light on), PRESS & HOLD the button
- The light will go off, and after a couple of seconds it will flash RED once
- DO NOT RELEASE the button, the light will flash red twice, go off, flash three times, four and then five
- After you see it flash five times, release the button
- The light should now start flashing green and yellow, SHORT PRESS the button to confirm
- The BeoLiving Intelligence will now erase all configuration and settings, this may take up to a minute
A video example showing the use of Function 2 to set the BLI’s password to “admin” is available here.
Web interface usage
The initial page after accessing the BLI via web browser shows two buttons: WEBPANEL and SETUP.
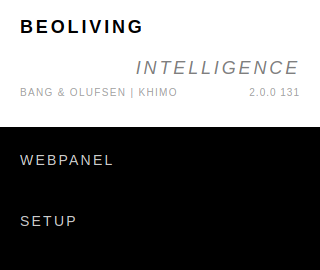
- WEBPANEL: This interface offers home automation control of your setup. Control of NetworkLink products is not supported, only Scenes can be fired. With the BLI in PRO mode, it’s possible to control your whole installation.
- SETUP: This interface is used for configuring/programming your BLI setup.
Setup interface
The Setup web interface for the BLI ESSENTIAL does not offer a high degree of customization. In fact, this interface should be used in exceptional cases, or for upgrading your BLI to PRO (see section Upgrade to PRO for further information). After performing the upgrade, the Setup web interface becomes the most important tool for configuring and programming your setup.
Upgrade to PRO
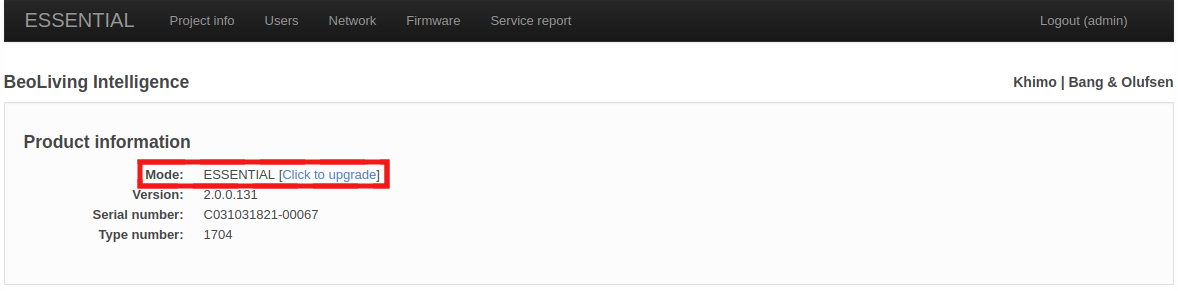
While logged in as the “admin” user (following the procedure described in the introduction), at the top menu bar the ESSENTIAL access page contains information regarding your BLI and Licensing information. In Product information, the License type shows the current license (ESSENTIAL OR PRO) for your BLI, with a link for upgrading to BLI PRO. This link will redirect your browser to Khimo.com to start the upgrade process via PayPal.
After the payment process finishes, your BLI will be upgraded to PRO mode within a minute approx.
Project info
The Project information page shows information regarding the project BeoLiving Intelligence is part of.
- Project name: Name for the project.
- Display name: Name shown for the BLI in all the user interfaces, such as BeoLiving App and WEBPANEL. You can set this value to something meaningful such as your family name or the house street address.
- Installer name: Reference name of the installer/company in charge of this project.
- Installer contact: Any type of contact information to reach the installer/company in charge of this project for future questions or comments.
Users
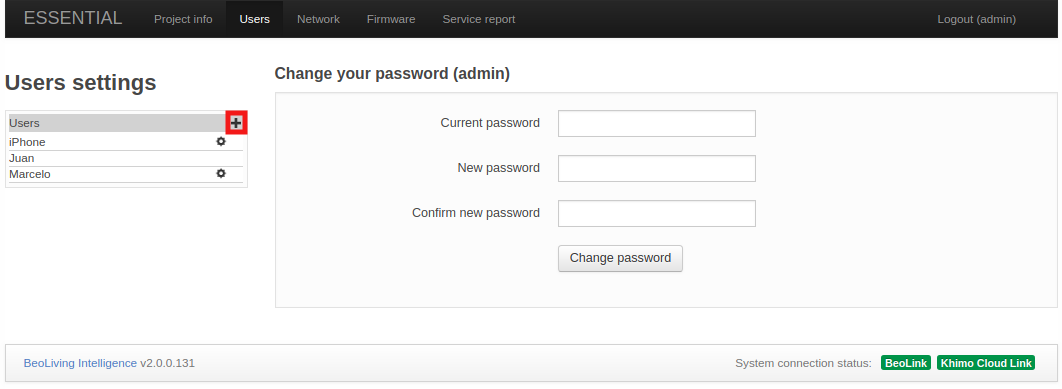
The User page displays in its left column every user that can access the BLI. New users can be added by admin by pressing the “plus” button.
User properties
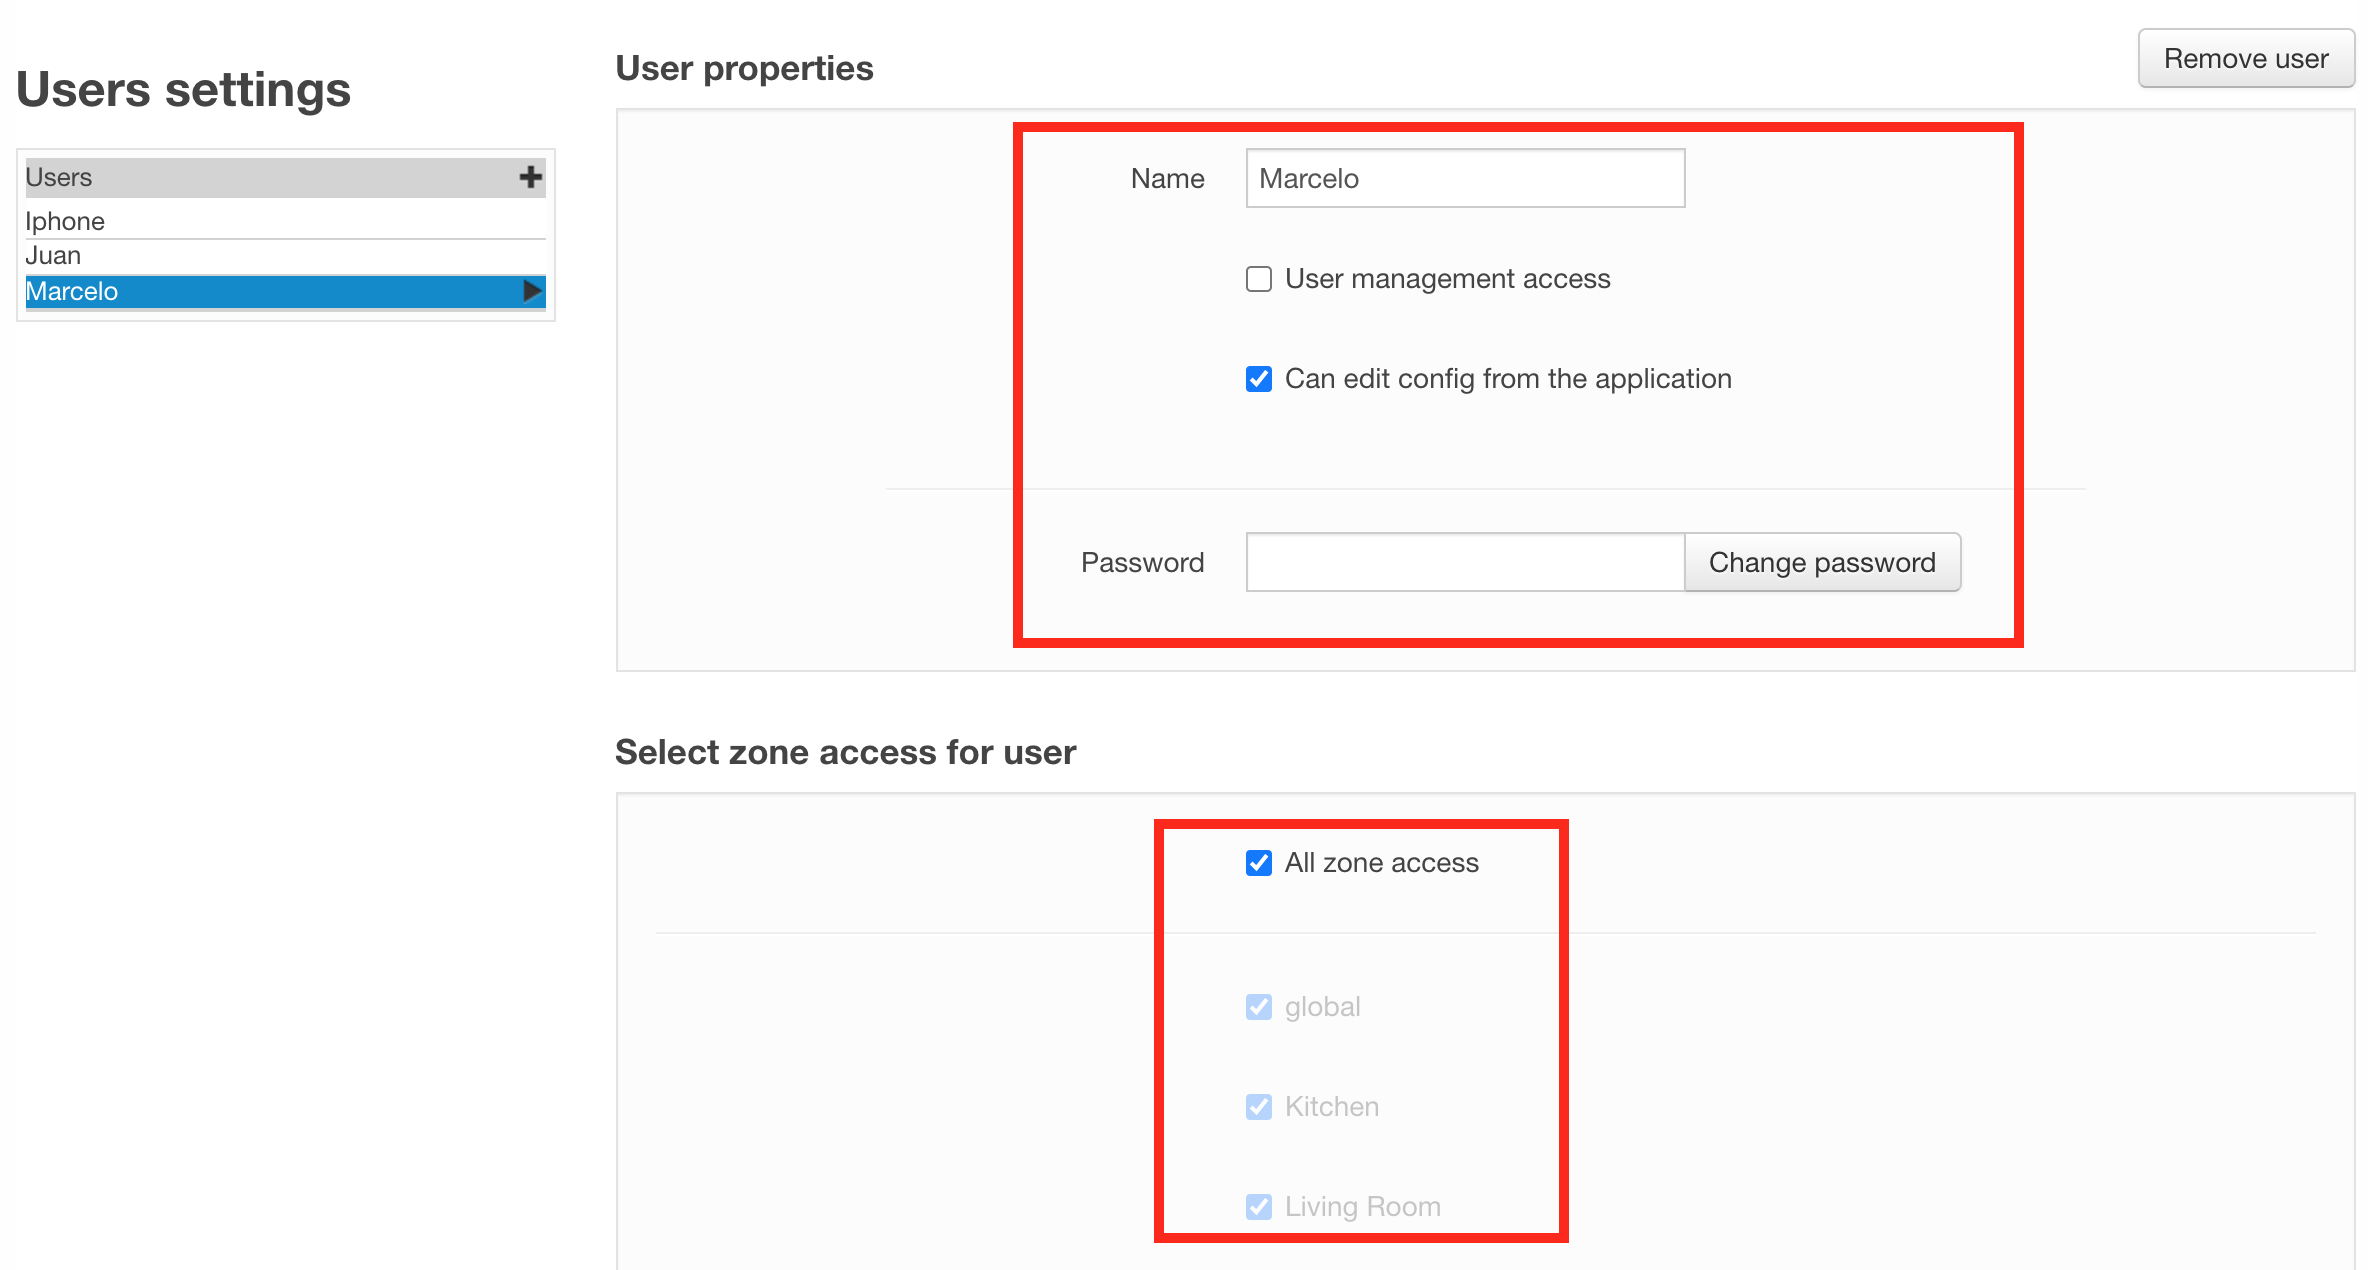
- Change user password: this can be done only on users that were created by admin.
- Enable/Disable User management access: when selected, the user is allowed to manage users and user rights. As a general rule, this option should be set only for the home owner.
- Enable/Disable Can edit config from the application: when selected, the user is allowed to create scenes and edit device settings or zones from the BLApp.
Select zone access for user
In this section, you can configure the zones a selected user has access to. All zones of the installation are displayed as check boxes that enable/disable access to it. All zone access means that the user can control any zone of the installation.
Network
The Network page details the network connectivity configuration for the BLI.
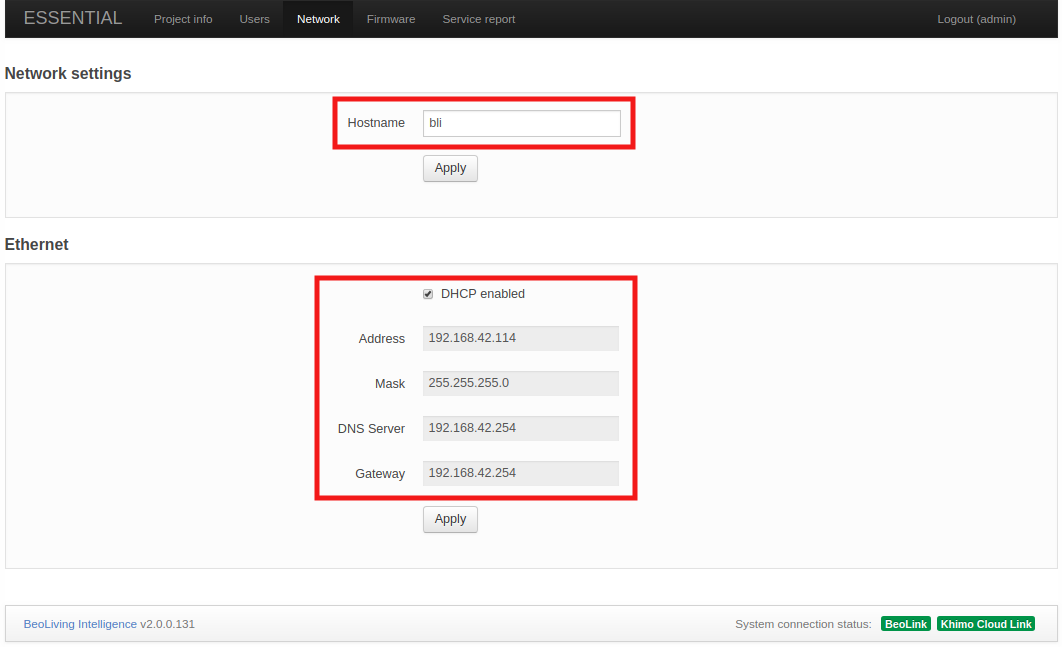
The configurable settings are:
- Hostname: Name of BLI as it is found in the LAN.
- DHCP: Enable/Disable DHCP mode. Per factory default, DHCP mode is enabled.
- Address: If DHCP is disabled, the static BLI network address could be set in Address.
- Mask: Network mask related to BLI LAN.
- DNS Server: DNS Server network address in LAN.
- Gateway: Gateway address in LAN.
Any change to the settings are confirmed by pressing the Apply button.
Firmware
The Firmware page allows you to check and apply updates for the BLI Firmware. There are two ways to perform such updates:
- Manually uploading a BLI firmware file.
- Online update through the Internet.
Manual update
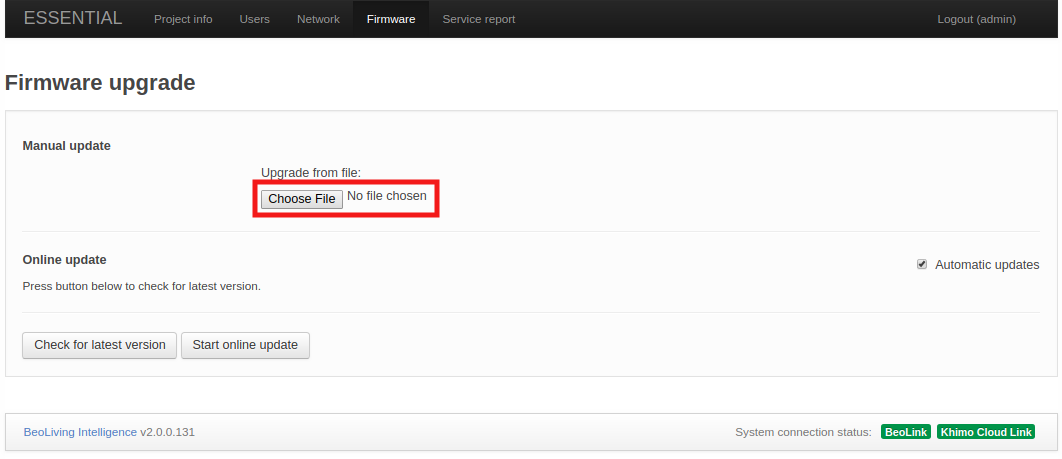
Press the Choose File to select your local BLI firmware file which will be uploaded to the BLI, the update process will commence immediately.
Online update
To perform an online update to the BLI’s Firmware you must ensure that it has Internet access.
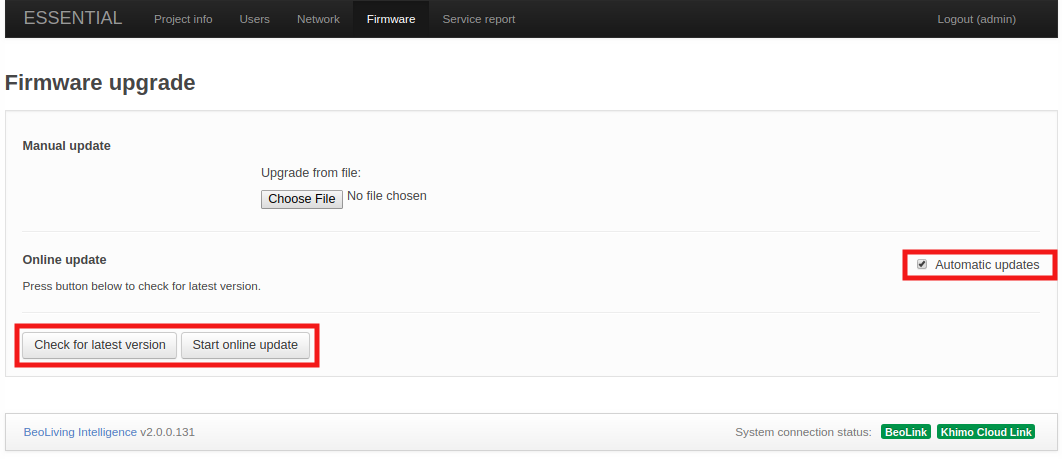
- Check for latest version: The latest official Firmware version will be displayed (if available and different from the current one).
- Start online update: If a new Firmware version is available for download, this button will start the Firmware download and installation process.
- Automatic updates: Enable/Disable automatic BLI Firmware updates. If this option is selected, the BLI firmware will be automatically kept up to date.
Service report
When any hardware or software error is experienced it is possible to create a service report containing the necessary information about your BLI, this will help solve any potential issue.
You must fill the form shown in the page, which will include essential information to reproduce and fix any issue you are experiencing.
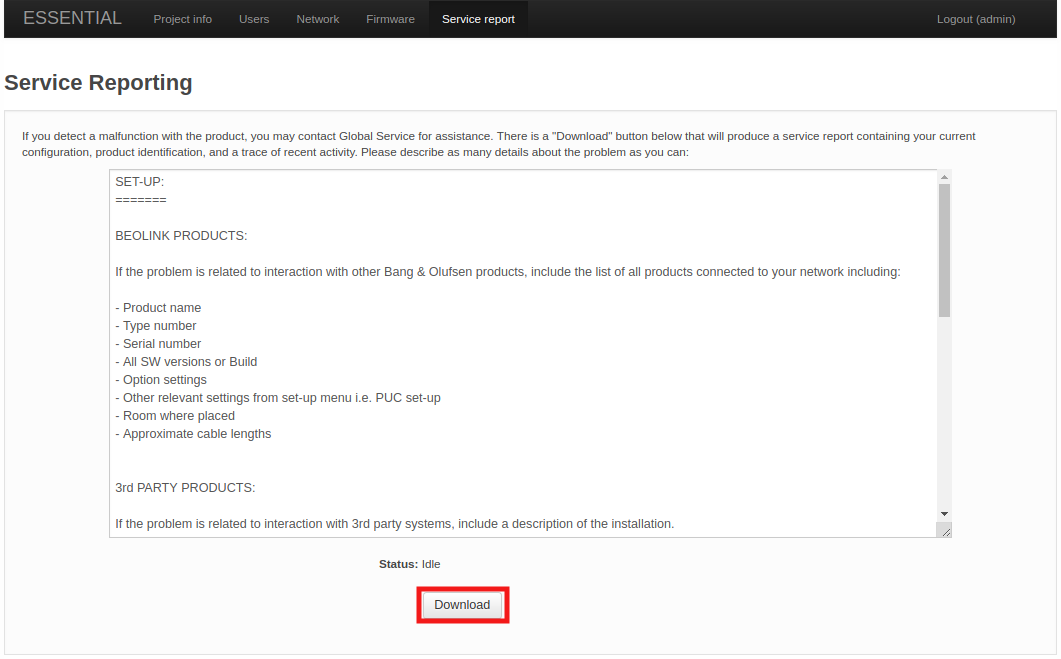
Service reports are created and downloaded when the Download button is clicked.